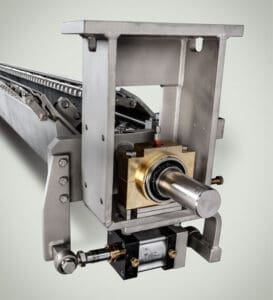
Doctors are essentially simple beam devices, but that doesn’t mean they should be taken less seriously when it comes to handling. The fact is, they are machined within thousandths of an inch. Careful handling, proper installation, and maintenance must all be combined to ensure successful operation.
The tight tolerances must be protected. Any damage will affect overall performance, so they must be handled carefully to avoid damage. Follow these recommendations:
- Don’t drop it. That’s pretty obvious, but proper rigging procedures should be followed throughout any move.
- Protect the holder. A bent holder will cause uneven blade pressure and possible roll scoring. When possible, place slings around journals or use proper lifting eyes. Use clean nylon straps, or use padding with cables or dirty straps. If necessary to place slings around the doctor back, protect the holder with blocks to keep straps from contacting the holder.
- Watch your balance. When lifting the doctor, keep the doctor from rotating uncontrolled due to its natural balance. This also applies to subsequent maintenance.
- Plan ahead. Try to pick up the doctor in nearly its operating position. This will help simplify moving it into the machine.
INSTALLATION AND ALIGNMENT CONSIDERATIONS
- Coordinate doctor installation to fit with other scheduled shutdown tasks, including roll changes, fabric changes, and crane availability. Allow enough time for mechanical installation work and alignment.
- Determine manpower requirements. Schedule dedicated millwrights and other staff (E&I) to ensure all tasks are satisfactorily performed.
- Whenever possible, complete prep work (e.g., run pneumatic, electrical, and lubrication lines, and/or remove interference) ahead of the installation day.
- Check the site for any possible interference. Best not to take anything for granted because not everything is noted on doctor drawings.
- Clean and inspect the doctor mounting surfaces.
- Have any special items ready ahead of time. For example, installing doctors in dryer sections frequently requires special planks to slide the doctor into position from the aisle. And press sections or basement locations may require scaffolding for access.
LAYOUT AND BRACKET INSTALLATION
Proper bracket location is vital to doctor installation and alignment. How you approach the work is important, so keep in mind:
- Take the time to layout parts in an orderly fashion according to the doctor drawing. Confirming the fit and orientation ahead of time will help make for a smoother installation.
- Of course, many components will be tagged with part numbers indicated on assembly drawings, but do not remove tags until ready to install.
- Layout the doctor bearing bracket position using the dimensions noted on the assembly print.
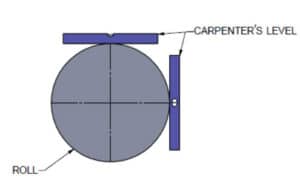
- Most doctors are located by the roll centerline to doctor journal centerline distances. By knowing the roll radius, you can use a carpenter’s level tangent to the roll on the top (bottom) and at 3 o’clock (9 o’clock) to transfer roll centerlines to the machine framing (see FIG 1). Place the level at the top (bottom) of the roll, and transfer top (bottom) tangent to frame. Measure down (or up) by roll radius to mark horizontal centerline on the frame. Use a similar procedure to mark the vertical centerline.
- The doctor journal centerlines are located midway between adjusting slots on the doctor bearing bracket, and above the bracket by the distance from the base to bearing center. This can be scaled from print or measured on the actual bearing.
- Clamp doctor brackets to the frame according to the measurements and marks noted above. Then, use the doctor bracket as a template to mark hole position (and/or any weld-plate position.) Drill and tap machine frames as indicated on the doctor drawing.
Paper machine doctor blades have to meet and maintain extremely tight tolerances. Proper handling helps protect their performance. Productivity and product quality require it.
FIG 1: Using carpenter’s level to find horizontal roll tangent (similar procedure for vertical tangent)
Paris Miller, Sales/Service Engineer


